FSRio Manual
Introduction
The FSRio is a board made for dance game players with their own cab / pad. It allows you to connect FSR sensors to your computer via usb, it also supports lights which can all be configured using the software.
There are a lot of guides about building your own dance pad or upgrading your arcade pad to use FSR’s but I've found that each guide requires you to have some electrical / software knowledge. And in case you don't get into it, I have to say some of the guides explain the process very nicely but there are still a lot of people that cannot or do not want to get into this.
That’s what the FSRio is for! It’s designed to be plug and play, no coding / comping / soldering required. Just plug the sensors in the board, the board in the computer and start playing.
Hardware
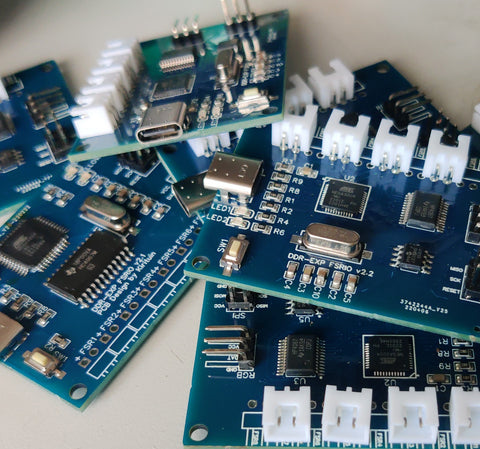
The FSRio is based on the arduino platform, more specifically the Arduino Leonardo. Just like the leonardo uses an Atmega32u4 with usb but unlike the arduino it has USB-C instead of Micro USB.
The connectors / interfaces on the board are:
- USB C - Shows up on the computer as a gamepad
- FSR connectors - Where you plugin your sensors
- RGB - Connection for an addressable RGB strip (WS2811 / WS2812)
- SPI - Firmware port, used in factory for preloading. Can be used for recovery
Sensors
The FSRio can use up to 16 FSR Sensors. An FSR is a Force Sensitive Resistor, meaning when pressure put on the sensor changes it allows more or less electricity to run through it.
The board can measure these values and with it’s firmware tell the computer to press the right buttons at the right time.
There are a lot of types and shapes, but they all generally work the same. Please note that an FSR is not the same as a Load Cell, the current FSRio does not have support for Load Cell’s.
Each sensor has 2 wires which form 1 connector. These can be plugged in the the FSRio on one of the 8 ports, the direction does not matter here.
Lights
The FSRio has 2 lights on the board itself, these are intended for debugging.
The green light is turned on when the ADP firmware is started, this means the board and the main chip is getting power, the firmware is properly installed and has started up.
The blue light tells you about communication, it will blink while USB packets are being sent and processed by the computer. So if it stays on or off data is not flowing. It will blink according to the speed as well so if there’s a slow/bad connection it will blink slowly. One other feature is the green light will be fully on when one of the buttons is triggered, this can tell you the sensor input is working without opening the adp tool.
Setting up
In order to get playing there’s two main steps to do: Connecting and Configuring. Let’s go through all the steps:
Connecting
For this first step we’ll need a few things (No tools required)
-
USB-C cable
-
Dupont extension wires (2 for each sensor, so 4 sensors is 8 wires)
It’s recommended to first connect everything at a desk, make sure it’s all working like you want it to, before installing it into your pad.
Once you have these ready, connect each sensor to an extension cable.
Next hook up all extension cables to the FSRio.
Last but not least, plug in the USB on your computer and the FSRio.
Configuring
Now that it’s all connected, it’s time to get to your computer. Let’s first check that the board is connected by opening the usb panel. There should be an entry for either “FSR Mini pad” or “FSRio”
After this go and download the ADP software. This can be found at the bottom at https://github.com/electromuis/analog-dance-pad/releases
Download the version for your platform (on windows, it will be adp-tool.exe). And open it, you should get a screen similar to the next picture.
Give each of your sensor’s a squeeze and confirm that one the bars is moving. If you’re using 1 sensor panel the default configuration is ok. But if you want to use multiple sensors per panel, or change the button mapping, open the Mapping tab. Here you can select what button number should work for that sensor. So 2 sensors per panel would look like
After this you close the software if you want. The software is not required for the FSRio to work. It’s only needed to change settings, it can also be very useful to fix sticky/unresponsive panels.
Now open StepMania, to go settings - configure mapping and set each arrow.
Pad
Great! It’s all working, next step is to put it all in your pad.
-
Disconnect the usb
-
Disconnect the sensor extension cables
-
Place the sensors in your pad as preferred.
-
Find a good place for the FSRio board. It can be under a panel or you leave it on the outside for easy access.
-
Run the extension wires through your pad and connect them to the FSRio and the sensors.
-
Reconnect the usb
-
Start playing
For sensor placement with an arcade pad most people use double-sided tape to stick a sensor on the inner L-bracet under each panel.
Support
If you run into any problems, or have any questions. You can email us at support@ddrpad.com